

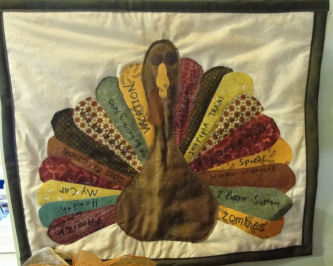
What are you thankful for? Making this Thanksgiving Turkey Quilt is a fun way to display what you and your family and friends are thankful for this Thanksgiving! Have all of your guests take turns writing what they are grateful for onto each feather of the quilt. It’s such a fun and meaningful activity to do, and a decoration you can bring out year after year! Make sure you place the date somewhere on the front or the back of the mini turkey quilt.
This post contains affiliate links. You can read my full disclosure HERE.
DISPLAY WHAT YOU ARE GRATEFUL FOR WITH THIS THANKSGIVING TURKEY QUILT! HERE IS WHAT YOU WILL NEED TO MAKE IT:
- about 1/2 yard of cream cotton fabric for front and back of quilt
- pre-packed quilt binding
- scraps of fall color fabrics for the feathers
- heat bond or wonder under
- quilt batting
- permanent black marker
- basic sewing supplies
Thanksgiving Turkey Quilt – Step 1


First, let’s make a turkey pattern. You can make your quilt and your turkey any size you want, but keep in mind that the feathers need to be large enough for folks to be able to write on each feather.
This is how I made mine. Tape four 8.5″X11″ pieces of computer paper together. Then with a black marker draw your turkey body. To finish your pattern draw a head, eyes, nose, and a gobbler. Last, draw a feather pattern.
Thanksgiving Turkey Quilt – Step 2

Cut out the turkey body pattern. Following the manufactures guide on the heat and bond, iron on heat and bond on the ugly side of brown fabric. Pin and cut out one turkey body from the brown fabric.
Thanksgiving Turkey Quilt – Step 3

Next apply heat bond to the fabrics you will be using for your feathers, once again, make sure to follow the manufactures guide on the heat bond. If you do not have heat bond you can zigzag appliqué each feather on. Then pin and cut out as many feathers as you would like for your turkey out of an arrangement of fabrics. I cut out 18 feathers because that was how many people were coming to Thanksgiving dinner. That way each person could write what they were thankful for on a feather.
Thanksgiving Turkey Quilt – Step 4

Peal off the heat-bond paper from the turkey body and the feathers and place the feathers where you want them. Place the turkey body over top and press. If you are not using heat-bond now is the time to pin and zigzag stitch the feathers on.
Thanksgiving Turkey Quilt – Step 5

Once you have added your feathers and body, you are going to zigzag stitch all the way around the edges of your turkey.
Thanksgiving Turkey Quilt – Step 6

Now using the scraps of fabric with either heat-bond or a zigzag stitch add the eyes, nose, and a gobbler.
Thanksgiving Turkey Quilt – Step 7

It is now time to write down what you are thankful for on each of the feathers. I had each family member right down what they were grateful for at Thanksgiving diner as they came in.
Thanksgiving Turkey Quilt – Step 8

Next cut quilt binding for the two smaller sides of the quilt. You want to sandwich the quilt in the quilt binding and pin in place. Stitch along the outer edge as shown in the photo. Finally do the same thing to the other two raw edges of the quilt.
You are now finished with your Thanksgiving Turkey Quilt! You can display what everyone is grateful for in a fun and festive way.

PIN IT FOR LATER

Leave a Reply