

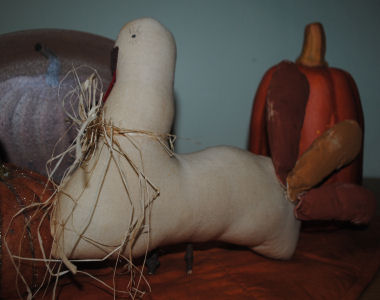
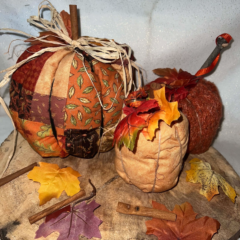
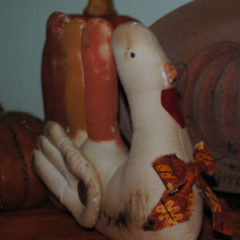
Gobble! Gobble! It’s turkey time! What a better way to get ready for Thanksgiving than with this stunning turkey centerpiece. It will be the talk of your Thanksgiving dinner and the best part, you made it! So let’s get crafty this autumn season and make some adorable Thanksgiving decor.
This post contains affiliate links. You can read my full disclosure HERE.
Add a special handmade touch to your dinner table this Thanksgiving with this prim and proper turkey craft. Here is what you need to make it:
- White Muslin Fabric
- Natural Raffia
- Red, Orange, and Gold Craft Paint
- Scraps of Gold and Red Fabric or Felt for the Nose and Gobbler
- 2 Little Sticks From a Tree Branch
- Hot Glue Gun
- Instant Coffee and Cinnamon for a Staining Mixture
- Craft Stuffing or Fiberfill
- Basic Sewing Supplies
Feel free to use this free Thanksgiving turkey craft pattern!
Thanksgiving Turkey Craft – Step 1
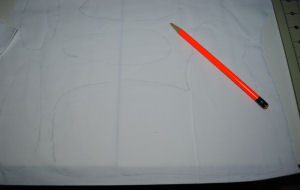
First cut out the shapes provided in out free turkey pattern from the white muslin fabric. You want to make sure you have two of each pattern piece. An easy way to do this is by folding your fabric in half so that you automatically get two of whatever you cut out.
Thanksgiving Turkey Craft – Step 2
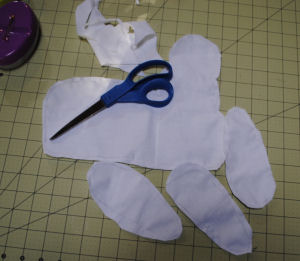
Next you are going to sew pressure foot edge on all of your pieces. Make sure to leave an opening for turning and stuffing.
Thanksgiving Turkey Craft – Step 3
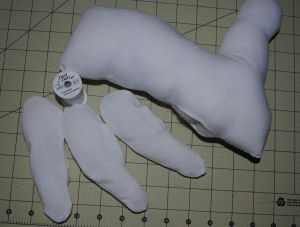
Then turn the turkey and feathers right side out (the side that doesn’t have and seam or raw edges). Once you have turned your pieces you are going to stuff them all. After that hand sew close that opening you left there.
Thanksgiving Turkey Craft – Step 4
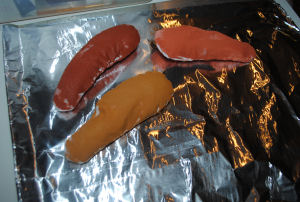
Now you are going to paint the feathers, paint one red, one gold, and one orange. Next you are going to add your stain mixture to them. The stain mixture is 1/4 cup of instant coffee mixed with 1 cup of warm water and 1 teaspoon of cinnamon and you are going to paint the whole turkey body and feathers on both sides. This will give your turkey a rustic look. Then you are going to place all pieces on a cookie sheet covered in foil and bake until dry at 170 degrees. You may want to flip the pieces every once in awhile to keep from burning. Keep a good eye on them.
Thanksgiving Turkey Craft – Step 5
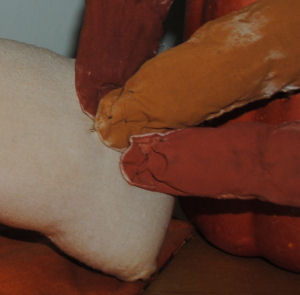
It is now time to add your feathers to the turkey body. You are just going to hand sew each of the feathers to the back of the turkey’s body.
Thanksgiving Turkey Craft – Step 6
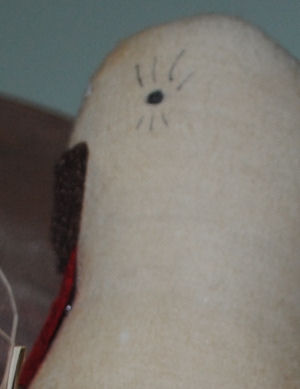
Next you are going to use permanent marker to draw on a fun fall face to your turkey. Draw an eye and some eyelashes. Once you have added your eye, cut a small triangle about 1/2″ from brown or gold fabric and hand sew or hot glue onto the nose area. Then cut a gobbler from red fabric about 1″ in size and sew or hot glue onto neck area.
Thanksgiving Turkey Craft – Step 7
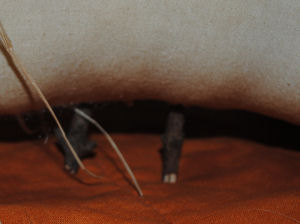
Finally you are going to cut 2 tiny slits into the bottom of the turkey where you want the little legs to be. Put a dab of hot glue on the end of a stick and poke the stick in the hole and hold in place until dry. You are going to do the same to the second leg. If you would like to add some finishing touches you can tie a piece of raffia in a bow around your turkey’s neck.
You are now finished your Prim and Proper Thanksgiving Turkey Craft and it is ready to strut its stuff on your table this Fall season.

PIN IT FOR LATER


Leave a Reply