

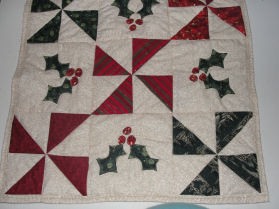
Oh by gosh by golly! It’s mistletoe and holly! Make your table tops more cheerful this Christmas with this Pinwheel Holly Quilted Table Topper. The forest green and cranberry red pinwheels and holly berries are framed perfectly against a cream background. This quilt will look lovely hanging on your wall, set on your table, or draped across your armchair during Christmas time.

This post contains affiliate links. You can read my full disclosure HERE.
MAKE YOUR HOLIDAY SPECIAL BY DECORATING WITH THIS CHRISTMAS PINWHEEL HOLLY QUILTED TABLE TOPPER! HERE IS WHAT YOU WILL NEED TO MAKE IT:
- scraps of red and green homespun fabrics and Christmas cotton fabric
- 1/2 yard of cream cotton fabric
- fusible heatbond (optional)
- quilt batting (warm & natural is our favorite)
- basic sewing supplies
Christmas Pinwheel Table Topper – Step 1

You are going to start your project by preparing your fabric. Cut 10″ squares from five different Christmas print fabrics. As well as five 10″ squares from cream fabric.
Christmas Pinwheel Table Topper – Step 2

The next thing you are going to do is cut the cream squares in half diagonally.
Christmas Pinwheel Table Topper – Step 3

Then move the ruler to the opposite points and cut them again diagonally to get four pieces. Set aside the pile of cream pieces. After you have done the cream squares do the same thing to each Christmas color square. Set them aside in their own pile.
Christmas Pinwheel Table Topper – Step 4

Now you want to place one Christmas fabric piece and one cream fabric and place pretty sides together. Pin the long edge and place and then sew it using the pressure foot as your guide.
Christmas Pinwheel Table Topper – Step 5

Continue sewing all four of your squares in the same manner. Then press the seams together towards the darker fabric as shown. Clip off the “dog ears” or extra triangle on the ends of each square. You want to make it so that all of your edges of your square are even.
Christmas Pinwheel Table Topper – Step 6

Now line up the four squares the way they should go to form a pinwheel when sewn as shown in photo above.
Christmas Pinwheel Table Topper – Step 7

Next, place the top right piece over the top left piece and pin. Place the bottom right piece over the bottom left piece and pin the seam. Stitch both in place at seam.
Christmas Pinwheel Table Topper – Step 8


Now place the top row over the bottom row and pin in place matching the center seam. Stitch the seam. There is a picture above of what the two rows should look like before you put them together. You want to make sure your rows are being put together correctly or else you won’t get that pinwheel effect.
Christmas Pinwheel Table Topper – Step 9

Press seams to one side. There, you’re first pinwheel is done. Do this to all colors so that you have five pinwheels.
Christmas Pinwheel Table Topper – Step 10

It is now time to start constructing your quilt. Cut four 8.5″ squares of cream fabric. Place the pinwheels and squares of cream fabric the way you want your quilt top to look.
Christmas Pinwheel Table Topper – Step 11

Start you quilt by forming three rows and then sewing the three rows together to form a quilt top. To form a row take the top right square and place it pretty sides together on the top middle square which will be a plain cream square. Pin in place and sew down the seam.
Christmas Pinwheel Table Topper – Step 12

Open up the two pieces of fabric you just sewed to lie flat on a surface. Now take the top left pinwheel square and place it on the top middle cream square and pin the side. Stitch. Repeat this step until you have three rows of three squares sewn together.
Christmas Pinwheel Table Topper – Step 13

Now sew the rows together. First take the bottom row and pin it to the middle row pretty sides together. Pin matching the seams. Stitch. Last pin the top row to the middle row, once again matching seams and stitch in place.
Christmas Pinwheel Table Topper – Step 14

Using the directions found on the heat bond material, press and cut out the berries and holly and press onto the quilt top where desired.
Christmas Pinwheel Table Topper – Step 15

Now you are going to cut out a piece of quilt batting and a piece of fabric for the back of your quilt using your quilt top as a pattern guide. You are going to layer the fabrics as follows flat on a table: the back of the quilt pretty side down, then the quilt batting, and last the quilt top pretty side facing up. At this point you may “quilt” the quilt sewing through all three layers any way you would like. I sewed around the green holly and around each pinwheel using a stitch-in-the-ditch method, however you may stitch wherever you’d like.
Christmas Pinwheel Table Topper – Step 16

Finally, using quilt binding, sandwich the quilt into the quilt binding and stitch around the outer edge of your quilt. Stitch on the quilt binding closest to the inner part of the quilt to catch all layers when sewing.
Your splendid pinwheel holly and berry quilt mat is ready to spruce up your holiday decorating!

PIN IT FOR LATER


Leave a Reply