A seam ripper is an essential tool in any sewing kit, but many beginners and even experienced sewers may not be using it correctly. That even includes myself! Indeed, for many years, I used a seam ripper in my sewing projects without giving much thought to the proper technique. I would simply grab it and start picking at threads, tugging with all my might. However, it wasn’t until a few years ago that someone took the time to explain the different parts of a seam ripper and the correct way to use it, which greatly improved my experience and made the process so much easier.
In this blog post, we will discuss what a seam ripper is, why it is necessary in sewing projects, and most importantly, how to use it properly. We will also recommend three of the best seam rippers on the market that we use in our studio, to help you find the perfect one for your needs.
What is a Seam Ripper?
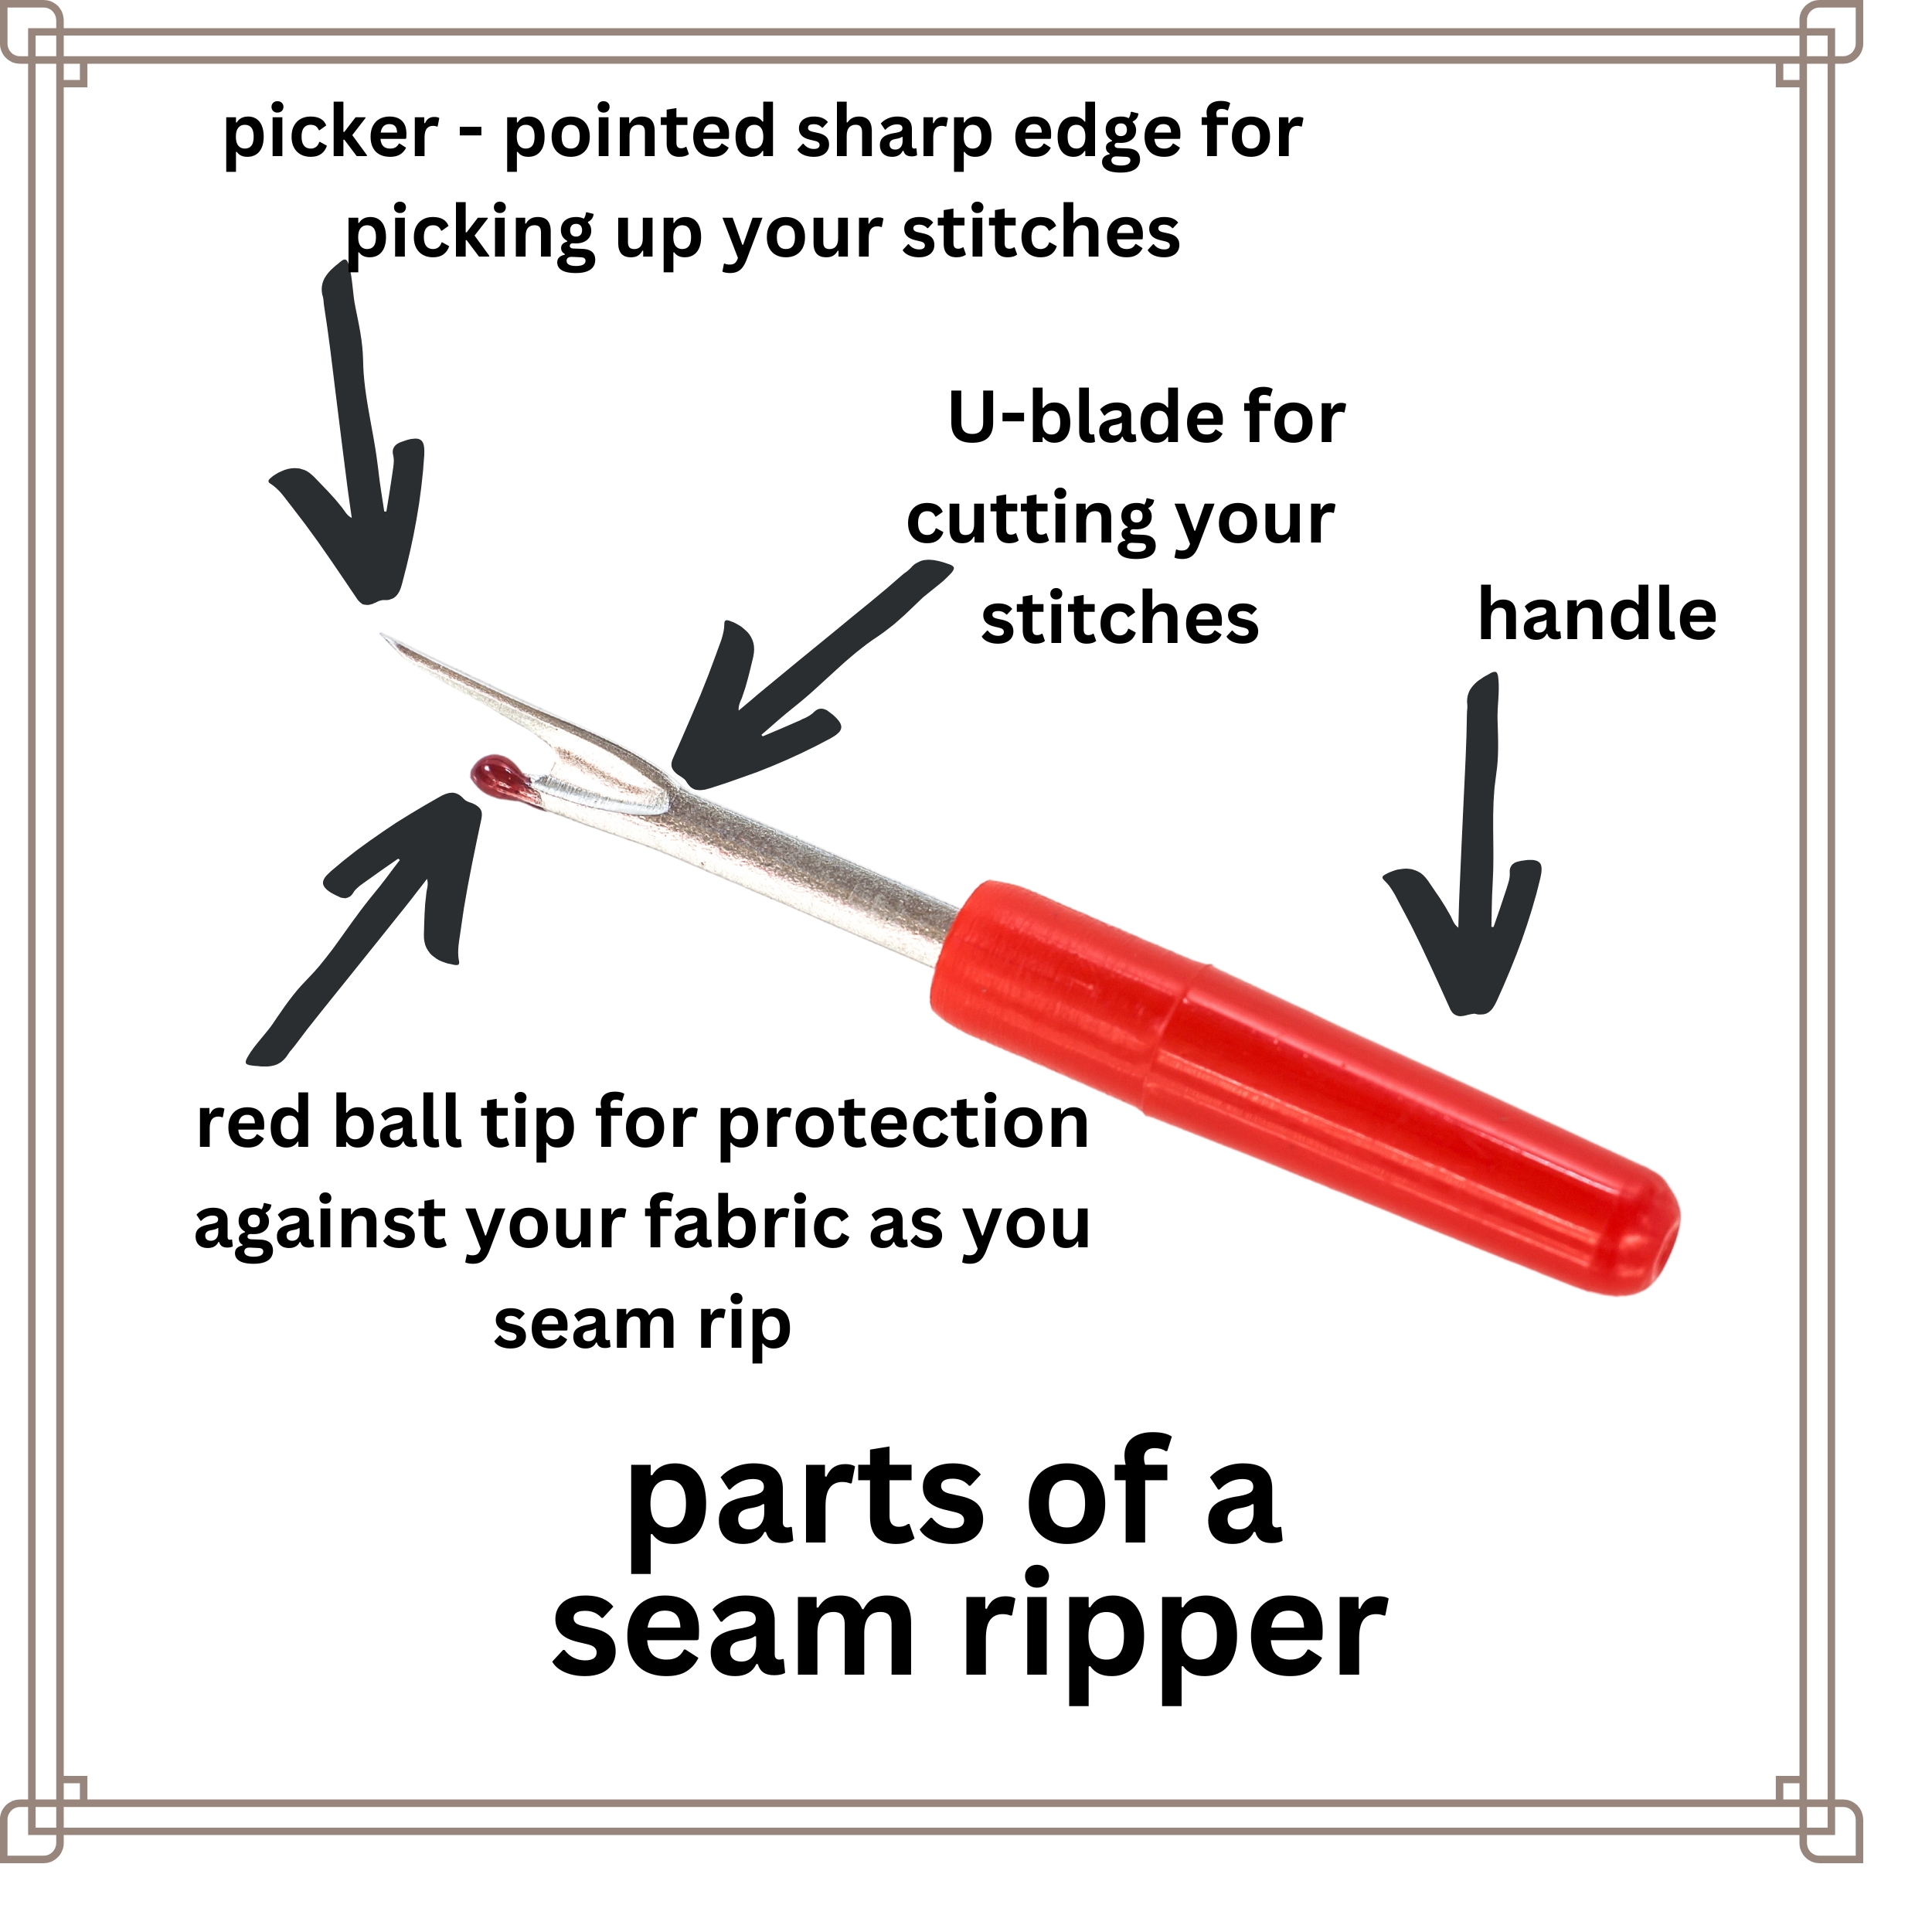
A seam ripper is a small, handheld tool designed to remove stitches quickly and easily. It typically consists of a sharp, pointed tip, a curved blade, and a handle for comfortable and precise use. Seam rippers come in various sizes and styles, but their primary function remains the same: to help you undo stitches without damaging the fabric.
One of the most important things to remember when seam ripping is to only grab your thread that you stitched, and not the threads of your fabric. Sometimes this is very hard to do if your thread is the exact same color as your fabric, especially in knit fabrics.
Disclosure: Some of the links in this article may be affiliate links, which can provide compensation to me at no cost to you if you decide to purchase a paid plan. These are products I’ve personally used and stand behind. This site is not intended to provide financial advice and is for entertainment only.
Our Favorite Seam Ripper: You can find plenty of these in our studio!
Why Do We Use a Seam Ripper?
Seam rippers are invaluable for several reasons, including:
- Correcting mistakes: No one is perfect, and even experienced sewers make mistakes. Seam rippers allow you to remove unwanted stitches without causing damage, so you can fix errors and achieve a professional finish.
- Alterations and repairs: Seam rippers are also useful for altering garments or repairing damage, such as removing seams to replace a zipper or adjust a hem.
- Deconstructing garments: If you are into upcycling or repurposing old clothing, a seam ripper will make it easy to disassemble garments and salvage the fabric for new projects.
How To Use a Seam Ripper Correctly
Follow these steps to use a seam ripper safely and efficiently:
- Choose the right seam ripper for your project. Select a size and style that is comfortable to hold and appropriate for the fabric and stitch type you are working with. These are our favorite seam rippers that we use in our studio.
- Identify the stitches you want to remove. Examine the seam closely and locate the stitches that need to be undone.
- Gently insert the seam ripper’s pointed tip under a stitch, making sure not to pierce the fabric. Also make sure you only have your thread and no fabric fibers. The curved blade should be facing away from the fabric to prevent accidental cuts.
- Push the seam ripper forward, allowing the curved blade to cut through the stitch. Continue this process for a few stitches, and then pull the thread out with your fingers or tweezers. So the blade is actually the curved edge, not the straight edge which most people think it is.
- Repeat this process, working in small sections until all the unwanted stitches are removed. Be patient and take your time to avoid damaging the fabric.
Top 3 Seam Rippers: A Quick Review
The Dritz Deluxe Seam Ripper is a popular choice among sewers for its durability and precision. You will find plenty of these in our sewing studio! With a comfortable, ergonomic handle and a sharp, curved blade, this seam ripper makes quick work of removing stitches. The safety cap is also a nice addition to prevent accidents when not in use.
Clover’s Seam Ripper is known for its slim design and sharp blade, making it perfect for tight spaces and intricate projects. The non-slip handle ensures a comfortable grip, while the protective cover keeps the blade sharp and safe when not in use.
Fiskars, a trusted brand in crafting tools, offers a reliable and efficient seam ripper. With its soft-grip handle and sharp, precision-ground blade, this seam ripper is designed for comfort and control. The included plastic cover helps protect the blade and prolong its life.
A seam ripper is an indispensable tool in any sewing kit, providing an easy way to remove stitches without damaging your fabric. Understanding the correct way to use a seam ripper will save you time and frustration, allowing you to correct mistakes, make alterations, and deconstruct garments with ease. By choosing the right seam ripper for your needs and following the steps outlined in this guide, you can ensure that your sewing projects are completed with precision and professionalism.
Remember to consider factors such as comfort, blade sharpness, and durability when selecting a seam ripper. Our top three recommendations – the Dritz Deluxe Seam Ripper, Clover Seam Ripper, and Fiskars Seam Ripper – are all excellent options with their unique features and benefits. By investing in a high-quality seam ripper, you can enhance your sewing experience and achieve better results in your projects.
In conclusion, mastering the correct use of a seam ripper is an essential skill for sewers of all levels. Whether you are a beginner learning the ropes or an experienced sewer looking to refine your techniques, understanding how to use a seam ripper properly will make your sewing journey smoother and more enjoyable. So, equip yourself with one of our top-rated seam rippers, and you’ll be ready to tackle any sewing challenge that comes your way.


Leave a Reply