
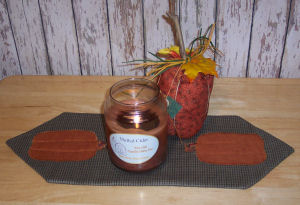
To celebrate the first day of the fall season, I will be showing you how to make a simple, primitive table runner. The appliqué pumpkins on top make this table runner perfect to have out for entertaining all season, especially during a Thanksgiving meal with the family.
This post contains affiliate links. You can read my full disclosure here.
Let’s get to sewing this adorable table runner! Here are the supplies I used:
- green plaid homespun fabric
- orange fabric for the pumpkin
- small brown fabric for the pumpkin stem
- quilt batting
- basic sewing supplies
Autumn Table Runner Step 1:
First, let’s make your table runner pattern. Take an 8 1/2″ X 11 1/2″ piece of computer paper and fold the top corners to meet in the center just like the photo shows.
Write on your paper in the center “Cut 2 on FOLD”. Make the bottom “place on fold” as shown in the photo.

Autumn Table Runner Step 2:
Pin and cut 2 of the table runner on the fold line as shown in the photo. Next, pin and cut 1 of the table runner pattern out of quilt batting.

Autumn Table Runner Step 3:
For your next step, make yourself a pumpkin pattern measuring about 5″ x 3″. Pin and cut 2 out of orange fabric.

Autumn Table Runner Step 4:
Place the pumpkins on opposite ends of ONE of the table runners. Place the pumpkins pretty side up on top of the runner pretty side up. Pin in place. Cut a “pumpkin stem” out of scraps of brown fabric and put it under the pumpkin with a little bit showing as seen in the photo. We will be using the machine appliqué method: zigzag stitch around the pumpkin and stem stitching close to edge of the pumpkin.

Autumn Table Runner Step 5:
Place your quilt batting piece on a flat surface. Next, place one piece of table runner pretty side up. Next, place a 2nd table runner piece pretty side down as shown in the photo. Pin all the way around the runner. Leave an opening for turning. Straight stitch around the runner using the pressure foot as your guide. Don’t forget to leave an opening.

Autumn Table Runner Step 6:
Trim seams and clip corners. Turn your table runner pretty side out. Poke out corners. Press. Now you will want to hand stitch the opening closed.

Autumn Table Runner Step 7:
For your final step, to “quilt” your runner, straight stitch 2 lines down each pumpkin going through all 4 layers of fabric. Stitch them so they appear to make the pumpkin look 3D, as seen in the photo.

Your pumpkin appliqué table runner is now complete! I hope you enjoyed making this simple yet adorable autumn project! Put it out and invite some family and friends over for a nice meal this season!


Leave a Reply